Thursday, October 5, 2017

Between Two Humans: A Cat's Memoir


The sun rises on the treat platform and sets over the dining room bed. In between is nap time. My name is Marble. I'm a cat and I share my home with two humans.

The two humans sleep in a large human bed, but only at night. It makes a nice warm spot between them, perfect for napping, cuddling, and tunneling under the blankets, but then in the morning they get up and leave, and every morning I ask why they would ever leave the best place in the house for naps and cuddling. And despite my best arguments, they get out of bed. As a compromise, they put treats on the top of my treat platform, in the corner by the sunbeam. Sometimes they hum You're So Vain by Carly Simon, sometimes they make up words for me.

I had a dream they were 
Treats on my platform

They think I don't know their songs, but I do. I listen intently to everything.

When they're away I read their books. It's important to know the humans. They live in my house and must be understood.  

After the humans leave for work, it's time for patrol. I have to check the house, see if any toys need to be played with. Sometimes toys hide under the TV, they're clever like that. But I check every nook and crevice. 

If a toy is out of place, I stalk it, track it down, wait for my moment to pounce.

After pouncing, it's time for a nap. 

Then it's back on patrol. I not only have to keep the toys in order, I also guard the windows in case that old tomcat Moses comes prowling around. 

It's important to patrol every part of the house.

After patrols it's time for another nap, and as the sun moves to the dining room bed, I follow.

Eventually the humans will come home. I keep watch until they do.

Humans go to work every day, except vacations and special holidays called humans work from home day. When the humans are home, life is good, because humans have laps.

A lap is a wonderful thing and it is made from a combination of humans and books.

Laps can also be made with a television.


Sometimes a dog stays with us and I have to watch the dog.

After books, television, and watching the dog, the humans finally - finally! - take my advice and go to bed, where I have already left toys for them to play with. When they're both in bed I jump between them, that's my spot. While they're asleep I'm out on night patrol.


Come morning, I'll be up on my treat platform ready to do it all over again.

My name is Marble. I'm a cat.


That Hobbiton Glow


"Orton Effect?" You know it, it's that dreamy Hobbit-in-a-forest look. That glowing nature dreamscape. If you've ever seen a landscape photo that seems to, well, glow, you've seen a picture inspired by the work of Michael Orton who, in the 1980s, took to overlaying two photos of the same scene, one normal and the other blurred and overexposed. The normal photo provides the detail, and the blurred overlay provides the glow. This can be done today with a single picture in photoshop by duplicating it, blurring it, and lightening it. There are a few tutorials online on using the technique.

Create Dreamy Landscape Photos with the Orton Effect

Is the Orton Effect Taking over Landscape Photography?

While the author of the second article worries it's being overused, and certainly a strong Orton effect is obvious, using a light touch can add a subtle quality to landscapes without making every picture look like Lord of the Rings.

To try it out, I took an old photo from a trip to Mendocino, taken with the small point-and-shoot Canon DSC-TX10, a camera released in 2011 - the picture was taken maybe a year later. This is working with just a JPEG so the same result can be achieved with any camera phone - indeed, modern phones will take pictures far superior to this.

I started with the photo as it came out of the camera. A not-bad-but-not-great shot of the classic Mendocino coastline.


I then applied some sharpening and contrast with Photoshop layers. Now it has more "pop" but maybe too much. Definitely too much. Let's soften that up a bit.

I copied the picture, applied a Gaussian blur, and lightened it. This will provide the "glow" around the details. 

The final product, with the blurred layer nearly transparent (around a 25-30% opacity), softens the harsh contrast of the developed picture. It still has contrast and detail, but a subtle glow softens the landscape.

I can use the same technique but mask it so the effect is applied to the landscape and not the person (me) in this photo.

So not bad for an old JPEG. Now what happens if we try it with a modern RAW digital negative out of a DSLR? To find out, we went to Rowena Crest Viewpoint in northern Oregon.

Straight out of the camera you get a typical DSLR image, nice, if a little washed out:

With sharpening, contrast, and color correction, I brought out the blue sky and the trees.

Sharp! A little too sharp. A lot of the Lightroom sliders that "clean up" a picture are based on edge-finding algorithms, so after sharpening, dehaze, contrast, etc., you could find sharp edges make things look cartoonish, like everything has a pencil outline.

Lightly adding a gaussian blur layer brings back some of that softness. You still get contrast in the detail, but it looks less like a drawing and more like a picture.

And, the same location masking the subject of photo...

The fun of a hobby is finding new new tricks, trying them out, learning and perfecting the technique. While I wouldn't do this to every photo, it's good to know the otherworldly look is available if I want to use it, and the more subtle version can be applied if I want it. Learn and grow is the name of the game.


Sunday, September 24, 2017

Sometimes a Bird

Alights upon a tree in front of you, your camera in hand, ready, even with a short lens. And the sun, illuminating. You raise your hand right to it, from the shadows, so close you scarcely have time to believe, and capture the image with a click. Startled, it flies away.


Saturday, September 23, 2017

August 21st, 2017: The Great American Eclipse


They say your first total eclipse is like nothing else, that it induces a primal response quite unlike any other experience. Even astronomers say this. Some people who experience it once become hooked and spend the rest of their lives traveling around the world every two or three years chasing the next one. Me, I'm not fazed. I'm not after some transcendental experience. I've "done" astronomy, I know how the solar system moves, I have a mathematical familiarity with orbital mechanics and I've stood in a shadow before. An eclipse crossing nearly the entire continental U.S. was to me simply an amazing opportunity and I wanted to see it, perhaps try my hand at a challenging bit of celestial photography.

I didn't expect it to affect me the way it did. I didn't expect my nervous system to completely wig out at the sight of a black sun high in the midday sky. You don't realize what a profound impact the sun has on your senses, so ever-present as to be impalpable, and for two minutes I felt the absence of something I didn't even know was there. I not only saw the eclipse, I felt it, and with my nerves going full tilt in the throes of synesthesia I'd swear I could even hear it.


A Modicum of Preparation

There are a number of ways to safely view a solar eclipse. Eclipse glasses (be careful you get good ones, and undamaged), a pinhole viewer (the safest method), or you can use a small telescope, either with a solar filter over the front or with a projection system, which is what I used.

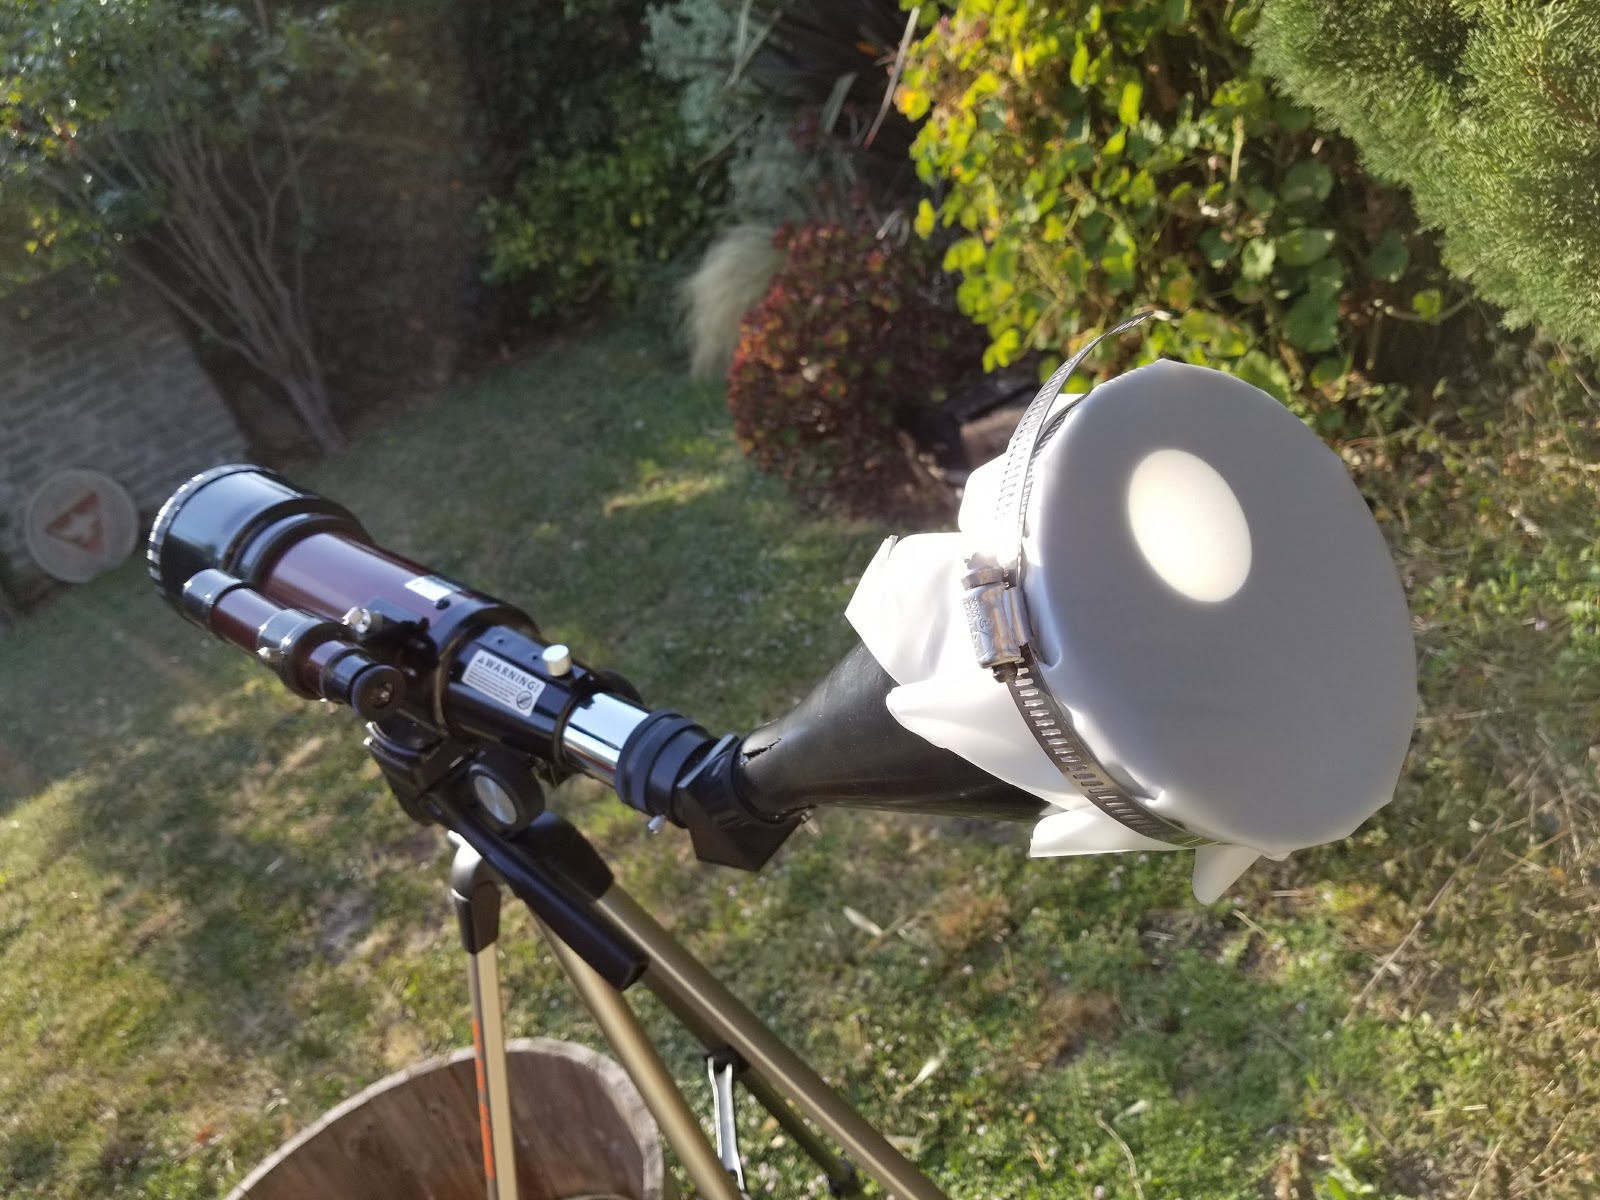
This is a cheap-ish 70mm portable scope, and has a clever dual lens cap that lets you stop it down to 40mm. That big lens is a magnifying glass and it can get hot, so using less of it means less chance to melt the little plastic bits inside. 


The plans for this setup were available on the NASA website and it's pretty simple to build with parts from the local hardware store. A funnel is cut to snugly fit the eyepiece at the narrow end while a projection screen is pulled taut over the wide end, in this case I used a white shower curtain (two layers) and a large hose clamp to hold it in place. I did this a mere week before the eclipse, tried it in the back yard, and it worked. I could see sunspots. 

I like the projection setup better than the filter for two reasons. One, it's much, much cheaper, but more significantly, the projection screen allows several people to watch at once, and we had a lot of people wandering by to take a look. 

With this for viewing, I turned my attention to the camera. I bought a solar filter for my 300mm zoom lens which goes on the Canon 6D which goes on a sturdy tripod. B&H photo threw in a set of five solar glasses for free with my purchase, so we had some to share. And with that, we were ready to go. 


A Modicum of Driving

Suitably equipped, we just had to get to Madras, OR, in the path of totality. Getting there involved some driving, so for much of the trip the sun looked like this.


There wasn't a lot of traffic on the way there. We flew into Portland and came down from the north, spent a day in Bend before driving up to Madras, the night before. It was only an hour drive, getting there. Getting out would not be so easy.

Sleeping in Cars

We camped in a field, and when I say camped, we slept in our cars. This field was just a giant parking lot and the whole night I was thinking oh boy is this the wrong place to be how are we ever getting out of here this has to be the least scenic location we could have picked in the entire world.

We were directed to our spot.


People just hung out and chilled beneath the starry sky.


We watched the stars a bit ourselves before turning in.


Good Morning Dusty Field!

Morning came and everyone awoke. Now we could see where we really were.

A parking lot.

But you know what, it was more community than parking lot. People brought all kinds of telescopes and viewing instruments, and everyone was walking around excited to check out what the neighbors had, who were of course happy to share.

The obligatory jokers in tinfoil hats. They were there, too.

Somebody was preparing to take a balloon ride. That must have been a sight. Somewhere up above a skydiver's plane was getting ready.

That solar scope on the right is a fancy bit of kit.

My own plan was as simple as I could manage. With the telescope projector for viewing, my camera would take a picture every few minutes until totality. First, I had to determine the proper exposure. At 300mm, the aperture set to f/11 should produce a nice sharp image, and after taking a series of test shots with different exposures, examining the histograms, I decided 1/125s was best.

When totality hit, the plan was to quickly remove the solar filter and cycle through a series of shots with different exposure times. I had no idea which one would work, all I could do was trust at least one of them would. I also had a compact camera for crowd shots and if I'm very lucky, a crowd shot with totality in the sky (spoiler alert: I was not very lucky).

Here We Go

And before we knew it, it had begun. The moon was edging in front of the sun.

Taking a bite.


Everyone watched in rapt attention.

As the bite grew larger.


We saw the crescent sun wane.


Until...


Bam! Totality.

It's impossible to capture in a picture, but there are two aspects to the image. With a short exposure the sky appears black and you can see the faint prominences, red solar flares on the edge.

With a longer exposure you see the solar corona, hot gas ejected from the sun, faint enough that it is washed out in normal daylight. The sky wasn't completely black, more a dark blue, strange color. And there's a star just below the sun.

Totality ends with a flash of light, as the edge of the sun reappears, forming what's known as a "diamond ring."

And Now, Sitting in Cars

And with that, it's time to go. Thanks for coming, now please enjoy eight hours on your three hour drive.

We had loaded up snacks, science podcasts, and playlists on the theme (Total Eclipse of the Heart, Dark Side of the Moon, You're So Vain, and so on), and with a full tank of gas we were prepared to sit in the car along with everyone else.


There's one road out and the speed limit signs are only there to tease us. Don't be fooled by this picture. If we had been able to go 12mph the whole way I would have been so happy.


Totally worth it.


Thursday, September 21, 2017

Mobile Photo Lab FAIL

For those of us who use cameras (the kind not embedded in a phone - how novel!), developing photos on a laptop is the easiest and most powerful way to create great pictures. But who wants to take a laptop on vacation? I'm trying to come up with a lightweight solution to develop and share pictures on the go.

I started with Lightroom Mobile on my phone. While it doesn't have all the features of the desktop version, it is capable of producing perfectly serviceable pictures for sharing on social media. I'll typically use this for updating friends and family from the road and then do more comprehensive development after I get home. It even syncs the adjustments between the two - mobile and destkop!

I use the Samsung Galaxy S8 with a 64GB internal microSD card and a USB-C SD card reader. At first, I simply plugged in the camera's SD card and imported the whole lot into Lightroom. It worked for the first trip but it's not quite the solution I wanted. So I bought a USB-C hub and portable external hard drive. Now I can connect the phone, camera card, and hard drive onto the same bus. I could even connect two hard drives to save duplicate backups of all my pictures. I took this kit on the road to try it out.


It didn't go well.

For a techie guy I can be surprisingly impatient sometimes. With everything connected, the phone simply wasn't recognizing the SD card and HD as external devices. I don't know why. After several attempts I gave up (for now) and connected the SD card directly to the phone and started a file copy. It was a slow copy, a lot slower than I expected, so I put it aside and came back after a nice brunch and walk around town. 

It failed half-way through. 

I forget the error, I was tired and didn't take a screen shot. I tried again and got the same error again. I had a little over half the RAW files on my phone now and no time left for a third attempt. We were back on the road. 

Then it happend. Google photos decided it ought to upload these photos to my account. These are RAW files, most of them garbage. By the time I realized what was happening my battery was dead and AT&T was sending me annoyed alerts (yes we know you have an unlimited data plan, don't make us slow your upload speeds). My photos account now had a lot of RAW files I had no intention of keeping, when I got home I would have to go through and delete them all. This kept getting worse and worse. 

I still think the idea is sound. At the end of each day I could, theoretically, save my photos to two hard drives (as a precaution against theft, for example, carry one with me, leave the other at the hotel), quickly develop a few gems as I go, and have everything ready for more intensive processing when I get home. It's a great idea. I just need to dig in and make it work. 

In this case, I shared a few photos directly from the camera, which also works. At least my Facebook friends thought it was okay.