Tuesday, January 31, 2017

Sunrise on the Sea of Cortez

We get up before dawn to chase the sun, because we find the interplay of light fascinating, mesmerizing, and when sun meets horizon for a moment the sky becomes an artist's palette.

In short, they call it Buena Vista, Mexico for a reason.

Lumix LX100, 10.8mm (24mm equivalent FoV), f/8, ISO 400


Ricoh GR II, f/10, ISO 1600, straight out of the camera with no post-processing


LX100 again, f/8 ISO 1600

Thursday, January 26, 2017

The Sunset at the End of the Workday

This is why I carry my Ricoh GR II everywhere, even to the office. Because when you see those clouds outside the window and know exactly when and where the sun will set (thanks, Photographer's Ephemeris!), you can go stand there. 
18.3mm, f/11, 1/60sec, ISO 100

Monday, January 23, 2017

Too Bright Too Early

Waiting in line for coffee early in the morning.
Ricoh GR II, 18.3mm f/11

Thursday, January 19, 2017

Evening Interlude

It's a rainy Wednesday evening in the city and there I am, sitting at the end of the bar looking out, cozy with my drink...
Smartphone, it's all I had on me at the time


...and there I am, daydreaming about a sunny Sunday evening on the beach.

70mm f/11

135mm f/11, rule of thirds

Thursday, January 12, 2017

Iceland: An Impulsive Click and Ensuing Study in Post-Processing Landscapes

Sometimes you don't know what you have until much, much later. This photo of Iceland sat there for months after I thought I'd gotten all the good ones. We had been walking along the southern cliffs near Vik when I spotted this couple enjoying the view and thought, aw, that's sweet, I should - click! - got it. I snapped a quick picture and it looked like a dark wedge of a shadow. Moving on...
straight out of camera, 70mm f/7.1
Months later I found myself looking through the digital negatives from that trip and thought I'd try to make this one a little more interesting in Adobe Lightroom.

For a landscape and sky picture, usually the first thing I do is lower the highlights to bring out the sky and raise the shadows to enhance the darker land. I often increased the whites and darken the blacks to sort of balance it out. Again, this is all using Lightroom sliders, quick and easy and you see more detail in the sky and more color in the land.


Already you can see some color in the sky start to come out, and the grass is looking brighter. And since it's a landscape, we can be forgiven for saturation and vibrance just a little. Not too much, just enough to tease more color out of the far background and clouds while hopefully not making the green foreground unnaturally bright. I also decided to crop out some of the dark foreground at the bottom so that the converging lines of land and sea meet in the corner.


Now the last touch is a slider I consider magic for landscapes: dehaze. With this one adjustment I can bring out the distance and turn that photo into this one:
Now we have that saturated color landscape everyone loves! The contrast between the distant surf and land is more apparent, as are the clouds.

Cropping, Rule of Thirds and the Golden Spiral

Most photographers know about the rule of thirds to make visually interesting pictures. It's easy enough to learn and use in practice, most digital cameras have an option to overlay the guidelines on the display screen as you shoot. Less known and more difficult is the golden spiral, which I haven't been able to achieve - at least not on purpose. 

Sometimes a composition just seems to draw the eye, and out of curiosity I used Lightroom's crop overlay tool to superimpose a golden spiral on the finished image and discovered it touches the rocky outcrop nicely. I'm not sure I have the wherewithal to do this on purpose, sometimes it just happens. In this case, I was just trying to make the surf and cliff meet in the corner. I only discovered later the golden spiral fit by happy accident.


Fine art photographer Elliot McGuckin recently created a study of the golden ratio in Ansel Adam's work. Perhaps he was genius enough to do it intentionally, or maybe he just knew what our eyes find pleasing. 


Wednesday, January 11, 2017

L.A. Skyline

Ah, the classic Los Angeles freeway skyline! Beautiful, isn't it.
I always wanted to take a picture like this myself, and I found it's easier than you might think! Here's how I did it, step by step:

Step 1: Rent a room at the Hotel Angeleno, as near the top floor as you can.
Step 2: Wait until it gets dark, but hurry before traffic dies down. (Kidding! It's L.A.!)
Step 3: Six second exposure at f/11 at the camera's base ISO, on a tripod of course.
Step 4: Done! Go have a drink by the pool before hopping on the bus to see David Gilmour at the Hollywood Bowl. Yes, that's right, photography is a process.

Chasing the Sun

Canon 6D with Rokinon 24mm, f-stop unknown but probably f/11

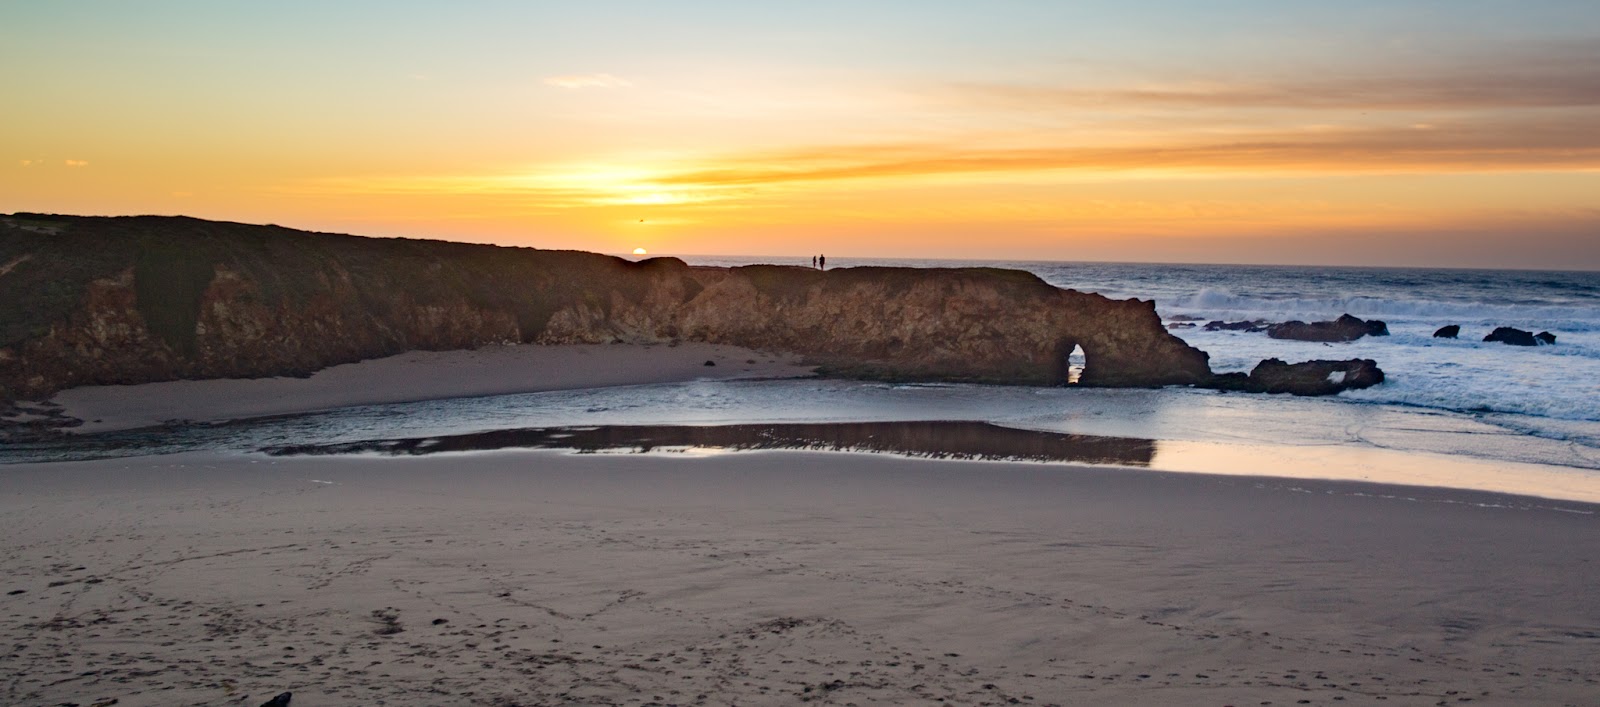
Pescadero State Beach
is a pretty little place, especially around sunset and when I made the switch from ASP-C to a full frame DSLR it was one of my first visits. The photo above is from that visit. The rest of the pictures below are from a more recent visit after nearly a year of practice. Hobbies are all about improving skills so when I compare old and new pictures from the same location I like to see a difference in quality.


If you enjoy sunsets and sunrises for photography or even just watching, a mobile app like The Photographer's Ephemeris can put you in the right place at the right time. This is a screen shot of Pescadero beach with a pin placed on what looks like a good place to stand. You can see the direction of sunset, denoted by an orange line pointing southwest (down and to the left) should be touching a rocky outcropping that's quite striking to see.

So finding myself with a free afternoon, I made a plan to be there for sunset with my trusty full frame Canon 6D and two lenses: a 17-40mm wide angle zoom for the sunset and a 70-200mm telephoto "just in case."

I arrived early so I could take a walk on the marsh first. It has some nice trails and lots of birds in the late afternoon sun. I enjoyed it a little too long, and by the time I got back to the beach the sun was starting to set. I was still a little ways from my spot near the rocky cliff but it looked so good I stopped and carefully changed to the 70-200mm tele for this shot, compressing the cliff and offshore rocks in front of the sun.
70mm f/13, 1/4sec at ISO 100
I walked to the rocky sea cliff I just photographed and though the "tunnel" to the other side, facing the ocean, for the wide angle shots I had planned. You can do this at low tide or if you don't mind getting your feet wet. A 6-stop ND filter lengthened exposure time to 5 seconds, and that's how you get that dreamy sea foam look. I pressed the tripod legs firmly into the wet sand hoping to prevent any sinking or movement as the waves came it. With the shutter open, an inch or two of water surrounded me and the tripod. I did not move.

5 second exposure at 26mm f/11

I got a little brave at one point and climbed up on that large rock to get even closer, timing the waves and carefully watching for rogues. This is not recommended. Didn't even get a better picture to show for my foolhardiness.

Trying to capture a constantly changing sunset makes you appreciate the rotation of the Earth. Hurrying to get in position as the light and colors changed really I felt like I was chasing the sun. After a few minutes the sun got away, dipping below the horizon and leaving this nice red reflection in the clouds and the sand.

15 seconds at f/8, the classic 35mm focal length

As the sun moves west so does the light, and day fades into twilight. Warm reds give way to cool blues and before long it was dark enough I didn't need the ND filter anymore.
1.6 seconds is slow enough for a sea foam effect, fast enough to catch a breaking wave
I wasn't the only one with this idea of a fun evening, either. Another person showed up with camera and tripod about the same time I did and we wound up chatting and shooting together for the most part. And so we go, until the colors fade, the show's over and it's time to go home.